

Wondering what to buy for Valentine’s Day? Why not make your own handmade gifts this year! We put together four fun Valentine’s Day projects that would make great gifts all on their own. If you want to go even bigger, today we’re going to show you how to assemble these DIY Valentine’s Day projects into the ultimate gift basket.
You can buy Valentine’s Day gift baskets already made, but it’s much more meaningful and special to make your own custom gift basket. Doing this also allows you to hand-pick the fragrances, colors and types of projects you want.
If you haven’t already, check out our fun and easy Valentine’s Day projects below. Our gift basket tutorial uses all of these projects:
- Valentine’s Day Tea Light Candle Recipe
- Luxurious Rose Petal Milk Bath Recipe
- Valentine’s Heart Wax Melt Bar Recipe
- Candy Heart Bubble Bath Bomb Recipe
Supplies for Making Your Gift Basket
Once you’re done making your choice of Valentine’s Day projects, you’ll need to gather a few additional supplies to assemble a gift basket. Here’s you will need to make for each basket. Adjust the quantity accordingly if you are making more baskets.
- 1 small decorative basket (ours measures approximately 12” by 10”)
- Approximately 4 oz of colorful crinkle paper
- Optional: approximately 1 to 2 yards of ribbon or tulle fabric strips
- Optional: silk flowers for filler

How to Assemble a Valentine’s Day Gift Basket
If you make all four of our projects, you should have enough items to fill one large gift basket or several small gift baskets that contain just a few items. You will have these items if you made each Valentine’s Day project:
- 2 jars of rose petal milk bath
- 2 boxes of 10 tealights
- 5 candy heart bath bombs
- 4 wax melt bars
You may choose to put all of these items in one gift basket, or save some of them. For our gift basket, we’re using all of the bath bombs and all of the wax melt bars. We’re using just one jar of rose petal milk bath and one box of tea light candles. Choose whichever combination you like best!
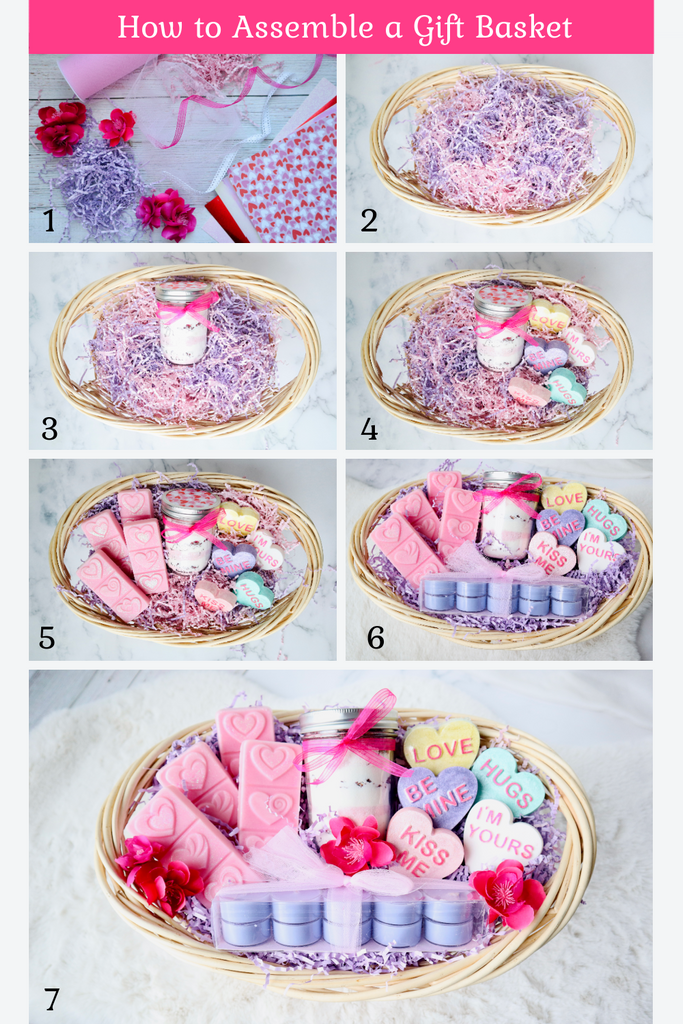
Now comes the fun part! After deciding what items to include, start assembling the gift basket with these steps:
- Gather your supplies. Tie decorative ribbon or a strip of tulle fabric around the milk bath jar and the tea light box (optional).
- Fill a basket with crinkle paper. The amount of crinkle paper doesn’t need to be exact – you just want your basket to be full enough to hold the gift items in place. Save some crinkle paper that you can use to prop up the gifts as you place them in the basket.
- Place the jar of milk bath mixture towards the back of the basket. As the tallest item, the jar will look the best centered and placed at the back. Place crinkle paper behind/around the jar as needed to keep it in place.
- Arrange the bubble bath bombs to one side of the jar. To make the basket look full, arrange the bath bombs so that they fan out from each other. Place a small amount of balled-up crinkle paper between the bath bombs to hold them in place and create space between them. This will help make the basket look fuller.
- Place the wax melt bars on the other side of the jar, standing them upright. Like the bath bombs, you can fan the wax melt bars out to help the basket look fuller. Place crinkle paper between and around the wax melt bars as needed.
- Lay a box of tea lights at the front of the basket. Arrange more crinkle paper around the tea light box to fill out the basket and hold the box in place.
- Optional: Place a few silk flowers in the basket where there are open spaces to help fill it out.
- Optional: Tie some ribbon or a strip of tulle fabric around the basket for a finishing touch.
Tips for Making a Professional Looking Gift Basket
There are no rules when it comes to assembling gift baskets. The freedom to use your creativity is what makes gift baskets so fun! However, we do have a few tips that will help you make your gift basket look polished and professional.
- Choose a color scheme that ties everything together. For our Valentine’s Day gift basket, all of the gifts were shades of pink and purple. We chose pastel pink and purple crinkle paper that complemented the color of the items. Plain white or natural colored paper would also look great without distracting from the gifts in the basket!
- Add a little contrast color. To make your gifts really pop, don’t be afraid to add a bit of contrasting color to the mix. This can be achieved by printing your labels on paper that contrasts the other colors, or by using flowers in a contrasting color to fill empty spaces in the basket. We used hot pink flowers and ribbon to create contrast.
- Lay the gifts flat or at an angle rather than standing them all upright. A gift basket is usually viewed from above rather than straight on at eye-level. With that in mind, you can sometimes show off your gifts better by laying them flat rather than standing them upright. However, it depends on the items you are including in your gift basket. For our Valentine’s Day gift basket, we positioned most of our items at a slight angle so they are laying mostly flat. This makes the gift basket look nice no matter what angle it’s viewed from.
- Place larger/taller items at the back. To ensure everything in your gift basket is visible, put the taller gifts towards the back where they won’t block out the smaller items. Smaller, flatter or shorter items tend to look best in the front of the basket where there’s nothing obscuring them.
- Include a variety of items. In a gift basket, it’s sometimes hard to avoid visual overload. To keep items from blending in with each other, choose items that are different sizes, heights, colors, shapes or textures. If there are multiples of the same item, it sometimes looks best to group them together. Using mix of patterned prints and solid colors will also prevent visual overload.
Shopping for a unique Valentine’s Day gift can be hard. But if you’re crafty, you can make your own Valentine’s Day presents that are way better than anything you could buy in the store. Assembling your handmade projects into a gift basket adds a professional touch and allows your hard work to truly shine.
Love making gift baskets? Check out our Mother's Day Gift Basket and Men's Gift Basket projects!