

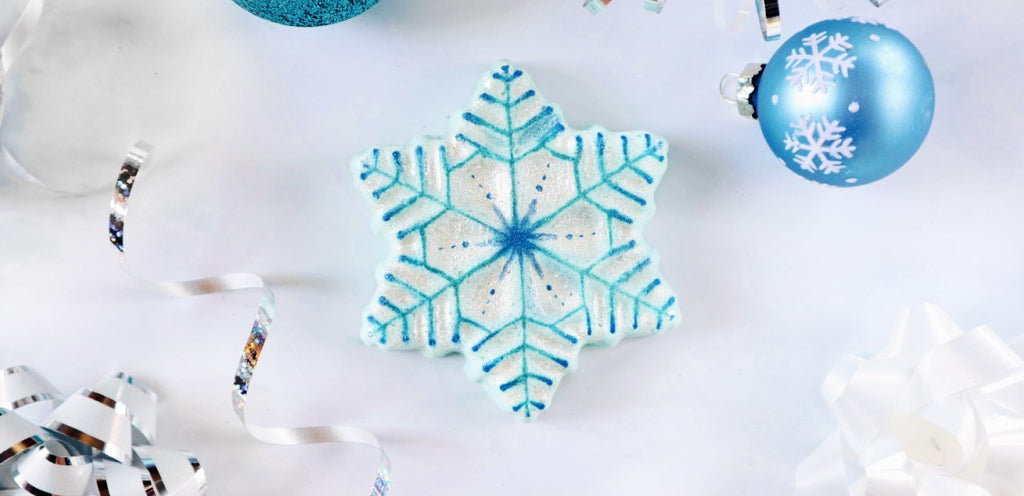
Bath bombs are fun and easy to make, but they're also the perfect gift or stocking stuffer. We have lots of festive holiday-themed bath bomb molds to choose from. Today we’re going to be using our Snowflake Star Bath Bomb Mold to make a pair of adorable bath fizzies that are perfect for baths all winter long.
Skill Level: Easy
Hands-on time: 1 hour
Yield: 2 medium bath bombs
Supplies
- 2 Snowflake Star Bath Bomb molds
- 3 1oz Measuring Cups (or other small dishes for mixing mica paint)
- Micro Scoop
- Face mask
- 3 ml Plastic Pipette
- Shrink Wrap bags (for packaging finished bath fizzies)
- Mixing bowl
- Nitrile gloves
- Measuring cups and measuring spoons.
- Spray bottle
- Small paint brush for adding details
Ingredients
- ½ cup Baking Soda
- ¼ cup Citric Acid
- 1 ½ T Epsom Salt
- 1 ½ T Corn Starch
- 1 T White Kaolin Clay
- 1 fl oz of skin-safe fragrance oil, such as:
- 1g jar of Sky Blue Shimmer Mica
- 1g jar of Super Sparkle Mica
- 1g jar of Azure Blue Shimmer Mica
- 1 g jar of Satin White Shimmer Mica
- Witch Hazel
- Rubbing Alcohol
Project Overview
We’ll start by mixing up our easy bath bomb recipe. First, we mix the dry ingredients, and then we add fragrance oil and a very small amount of witch hazel to create a moldable consistency. Once the mixture is combined, we will press it into the molds and let it cure for at least four hours. After unmolding our bath bombs, we’ll be painting them with mica to make the snowflake details pop.
This project yields 2 medium bath bombs, but it can easily be multiplied to make as many bath bombs as you like.
You Might Also Like: Matcha Green Tea & Lemongrass Pedicure Bath Bombs
Choosing Your Supplies
If you like, you can make this project with just one Snowflake Star Bath Bomb Mold. However, you will need to make each bath bomb separately, which will be more time consuming. You can also achieve a similar look by using our Round Snowflake Bath Bomb Mold if you prefer.
We made our snowflakes with Frozen Lake fragrance oil, but any skin-safe fragrance will do. See the ingredient list above for other snow-inspired fragrance choices.
Feel free to experiment with different colors of mica as well. We liked the look of Sky Blue, Super Sparkle and Azure Blue, but we have lots of other mica colorants to choose from if you feel inspired by different colors. Our 1oz measuring cups work great to mix up your mica “paint.” If you want to use multiple colors to decorate your bath bombs, we recommend having one cup for each color.
Read More: 10 Tips for Making Better Bath Fizzies
Step-by-Step Instructions
- Clean and dry your snowflake molds so they’re ready to go.
- Pour some witch hazel into your spray bottle and set aside for later.
- In a mixing bowl, combine dry ingredients:
- ½ cup Baking Soda
- ¼ cup Citric Acid
- 1 ½ T Epsom Salt
- 1 ½ T Corn Starch
- 1 T Kaolin Clay
- 1 micro scoop of Super Sparkle Mica
- 1 micro scoop of Sky Blue Mica
Tip: Because some ingredients have fine particles, we recommend wearing a face mask while measuring and mixing.
- Wearing gloves, use your hands to thoroughly mix the dry ingredients. Break any clumps apart and make sure they are fully incorporated.
Tip: You can also use a small blender (such as a Magic Bullet-style blender) to mix your dry ingredients more thoroughly. Add your dry ingredients directly to your blender cup or use a funnel to pour them from your mixing bowl into the blender cup. Blend for 10-30 seconds or until ingredients are fully mixed. Return ingredients to your mixing bowl.
- Using a pipette, add 10-15 drops of fragrance oil to your dry ingredients. Stir with your fingers until it starts to incorporate. You may add a few more drops of fragrance oil if desired.
- Begin spritzing your mixture with a few sprays of witch hazel from your spray bottle. After each spritz, compress the mixture to prevent any fizzing reaction that occurs. As soon as the mixture resembles damp sand, it is good to go. We spritzed our mixture with only about 10-15 sprays total, but the exact amount will vary depending on your spray bottle.
Tip: It works best to spritz with one hand while compressing the mixture simultaneously with your other hand. You should be able to form a solid clump in your hand that crumbles apart when crushed. Once you reach this consistency, don’t add any more liquid. If your mixture is too wet, it will start fizzing and expand out of your mold. Not only will this reduce the fizzing action in the tub, it can also make your bath bombs soft and difficult to unmold.
The photo below shows an ideal consistency that clumps together and is still easily crushed.
- Start packing the mixture into your bath bomb molds. Add a small amount at first, being sure to press it tightly into all the corners and details. Continue adding and pressing more layers until your mold is full. Repeat with your second mold.

- Let your bath bombs set for at least two hours. Ideally, they should be cured in a dry location. If the area is too warm or humid, it might affect how your bath bombs turn out. Consider having a dehumidifier in the room if the weather is especially damp or humid.
- Once your bath bombs are completely hard, you can remove them from the molds.
- Wearing a mask, prepare your mica “paint” by adding 1-2 micro scoops of mica powder to a 1oz measuring cup. Next, add a few drops of rubbing alcohol and stir. Simply add more mica or rubbing alcohol until you reach the desired consistency. Mix each color of mica in its own cup.
- Paint any details you wish on your bath bombs.The design possibilities are endless, so let your creativity take over! If you like the look of our snowflakes, here's what we did to make our design.
- Start by painting Satin White mica into the groves.
- Next, paint a thin line of Sky Blue onto each raised area of the snowflake design.
- Paint a dot of Azure Blue onto each point of the snowflake design. Then blend the dot into the Sky Blue by diluting your paint brush with rubbing alcohol and dragging the brush over the dot up the line of Sky Blue.
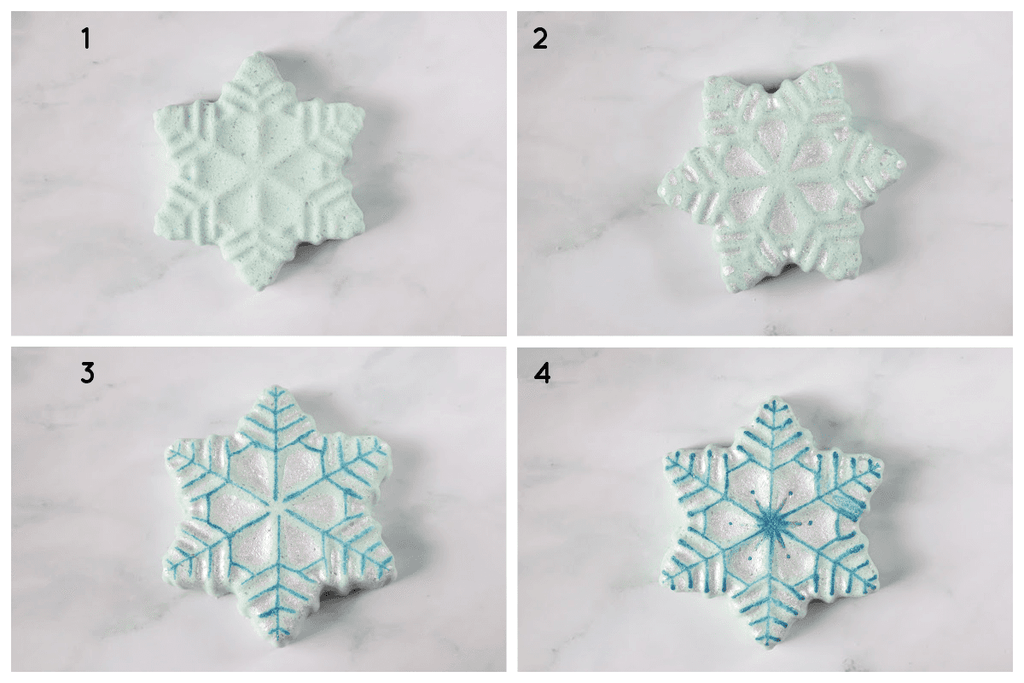
- Let mica paint dry completely.
- Once dry, you may package your bath bombs using shrink wrap bags and a heat gun. If you choose not to use shrink wrap, we recommend sealing your bath bombs in a different type of container. If left exposed to air, bath bombs will eventually absorb moisture from the atmosphere, which can change their performance.
![]()
