

Wickless candles are fun and easy to make as a gift or for yourself. They’re the perfect beginner project for those who have tried DIY wax melts and want to make something a bit more advanced.
What is a wickless candle? It's simply a candle without a wick. Wickless candles can be made in tins, jars or any other container that you would use for a regular candle. A heat lamp or base warmer is used to melt the wax, which releases the fragrance into the room. Because you don’t have to test wicks, they’re easier to make than a regular candle. However, they still smell just as amazing when used on a candle warmer!
You Might Also Like: How to Make Wax Melts with Mica Powder
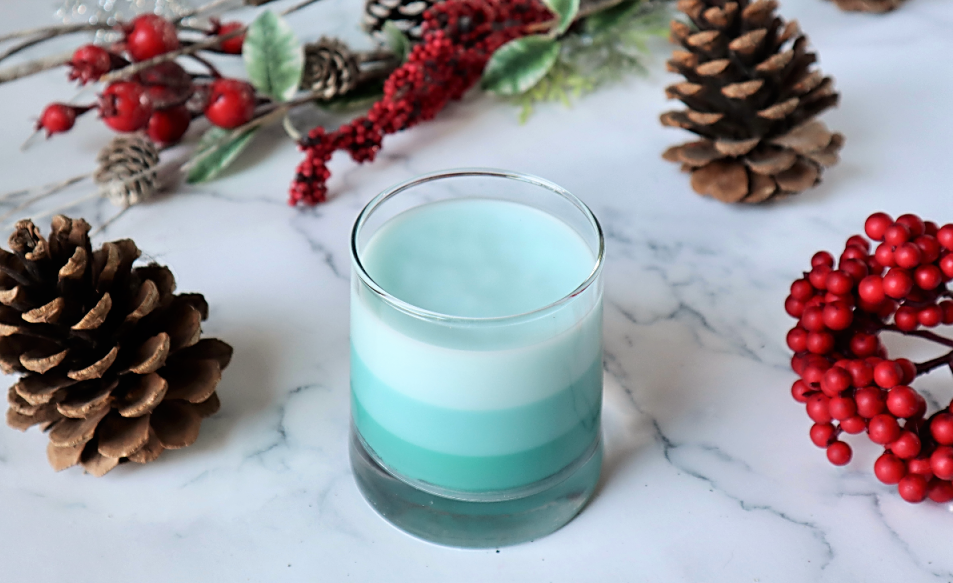
Today we’re going to show you how to make a fun gradient candle. Although this recipe uses a Christmas scent, it can easily be adapted to use any fragrance for any time of the year. Simply swap out the fragrance and the colors to suit any season!
Although it looks like a regular candle at first glance, it turns into a mesmerizing display of swirling mica once it’s placed on a candle warmer. Follow along as we create this fun and beautiful project!
Skill Level: Easy
Hands-On Time: 1-2 hours
Yield: Four 10 oz wickless candles
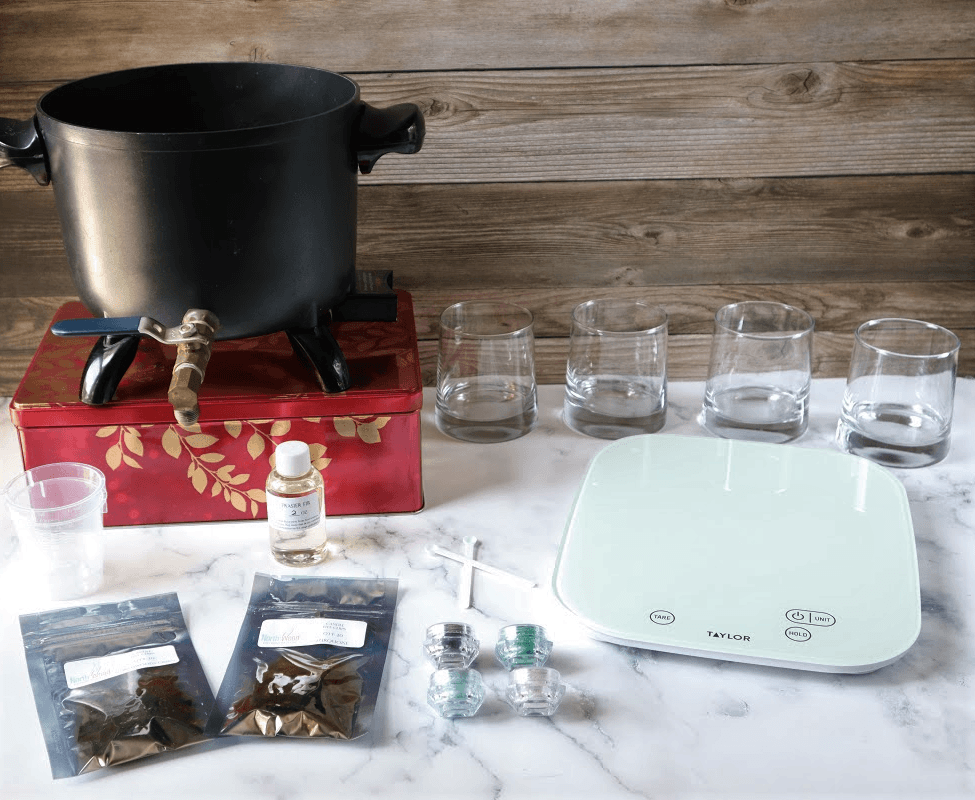
Supplies
- 4 Whiskey Glass Tumblers
- Face Mask
- Micro Scoop
- 1 oz Measuring Cup
- Straight Edge Soap Cutter or other cutting tool
- Melting pot such as a Presto Pot, double boiler or Metal Pouring Pitcher
- Digital scale
- Rubber/silicone spatula
- Small paintbrush for adding mica designs
- Optional: plate or tray for measuring wax
- Optional: heat gun
- Optional: nitrile gloves
- Candle warmer (for using final product)
Ingredients
- 2 lbs C55 Coconut Tart Wax
- 1g jar Moss Green Mica Powder
- 1g jar Mint Cream Mica Powder
- 1g jar Super Sparkle Mica Powder
- 4 Turquoise Candle Dye Chips
- 4 NorthWoods Green Candle Dye Chips
- 2 oz fragrance oil, such as:
- Rubbing alcohol
Project Overview
These candles are made with three different layers to create a gradient effect. We’ll be mixing the ingredients for one layer at a time. Each layer uses C55 Tart Wax, fragrance, dye chips and mica powder. After one layer is poured, it needs time to harden before we pour the next layer. Once the last layer hardens, we’ll be painting some decorative details with mica.
Note: Each layer follows the same steps. You are simply adding a different amount of dye and mica to each layer to achieve the gradient effect.
Choosing Your Supplies
We chose Sugared Spruce fragrance oil for this project. Because of our fragrance, we wanted to create a blue-green color that’s reminiscent of spruce trees. This was done by using both Turquoise and NorthWoods Green candle dye chips. If you want a true green color, it’s easy to do by using all one color of dye chip. Other green options include Avocado, Bright Green or Hunter Green. You can even use Fluorescent Lime Green if you wish! Have fun experimenting with different colors until you find a combination you like.
We chose C55 wax because of its superior scent throw. However, you can use other waxes if you prefer.
You Might Also Like: Pumpkin Spice Wax Tart Tutorial
Steps for Making Your Candles
- Clean and dry your Whiskey Glass Tumblers to remove any residue or debris.
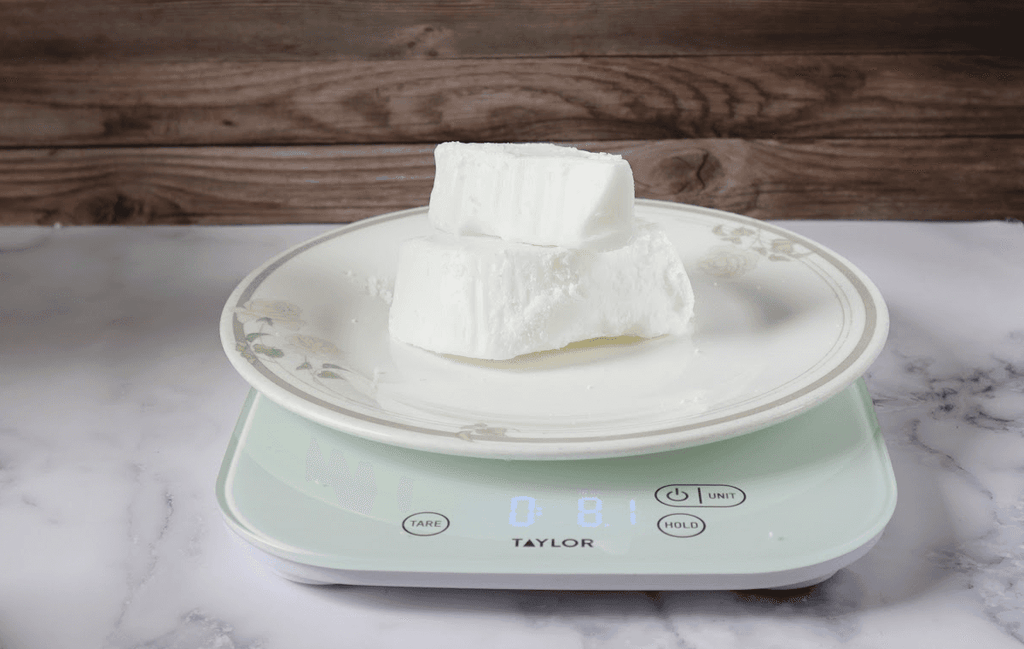
- Wearing gloves (if desired) weigh out .5 lbs (8 oz) of C55 Wax using your digital scale. We placed our wax on a plate to keep the scale wax-free.
- Prepare your melting pot. If you’re using a Presto Pot like us, set the temperature to 200 degrees F.
-
First Layer:
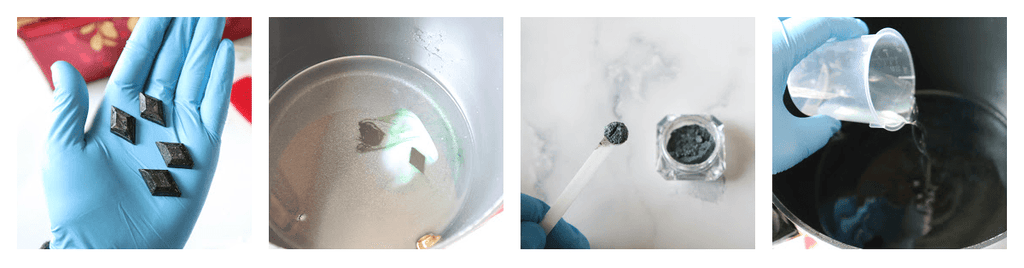
- Add .5 lbs of wax to the melting pot and stir with a rubber/silicone spatula. As it melts, add 2 NorthWood Green dye chips and 2 Turquoise dye chips to the pot and stir.
- Add 2 micro scoops of Moss Green Mica and 1 micro scoop of Super Sparkle Mica to the pot.
- Add .5 oz of fragrance oil to the pot and stir.
- Once wax is melted and ingredients are fully combined, turn down the temperature of your pot or set it to “warm.”
- Pour a layer that’s approximately .5” thick into each jar. Be careful if you need to move the jars to the side while the wax is hot.
- Let the layer cool for at least 30 minutes, or until the wax has hardened on the top.

-
Second Layer:
- Add .5 lbs of wax to the melting pot and stir with a rubber/silicone spatula. As it melts, add 1 NorthWood Green dye chip and 1 Turquoise dye chip to the pot and stir.
- Add 1 micro scoop of Moss Green Mica, 1 micro scoop of Mint Cream Mica and 1 micro scoop of Super Sparkle Mica to the pot.
- Add .5 oz of fragrance oil to the pot and stir.
- Once wax is melted and ingredients are fully combined, turn down the temperature of your pot or set it to “warm.” Pour a layer that is the same thickness as the first layer and let the wax cool for at least 30 minutes.
- You may notice the first layer change color as it warms slightly from the second layer.

-
Third Layer:
- Add .5 lbs of wax* (see tip below) to the melting pot and stir with a rubber/silicone spatula. As it melts, add 1/2 of a NorthWood Green dye chip and 1/2 of a Turquoise dye chip to the pot and stir.
- Add 2 micro scoops of Mint Cream Mica and 1 micro scoop of Super Sparkle Mica to the pot.
- Add .5 oz of fragrance oil to the pot and stir.
- Once wax is melted and ingredients are fully combined, turn down the temperature of your pot or set it to “warm.” Pour a layer that is the same thickness as the first layer and let the wax cool for at least 30 minutes.
- You may notice the second layer change color as it warms slightly from the top layer. The top layer may take slightly longer to harden than the first two.
- Once all your layers are poured, let your candles sit for several hours (or overnight). This allows them to cool fully.

Tip: If your candles cool too quickly or cool at an uneven rate, you may notice a sinkhole or divot has formed on the tops.
Any wax shrinkage is purely cosmetic and won’t affect how the candle performs. However, you can correct any sinkholes if you wish. The easiest method is to use a heat gun to remelt a thin top layer on top of your affected candles. When the wax cools again, it should be smooth.
You can also experiment with doing a second pour. This involves pouring another thin layer of your original wax to help smooth out the tops. When the layer cools, it will be smooth and free from any dents. *You may wish to melt slightly more wax when making the third layer (approx. .7 lbs rather than .5) if you want wax left over for a second pour. Simply leave the excess wax in your melting pot and remelt it when you’re ready to do your second pour*
Looking for more Christmas projects? Try our Christmas Cookie Soap recipe!
Decorating Your Candles
Once your candles are fully cool, you can begin decorating them!
- Put on your face mask, which we recommend using when working with mica powders.
- Mix some mica “paint” using a small amount of mica and a few drops of rubbing alcohol. Adjust the ratio of mica to rubbing alcohol to get a consistency that’s easy to work with. Tip: A 1oz measuring cup works great for mixing mica paint!
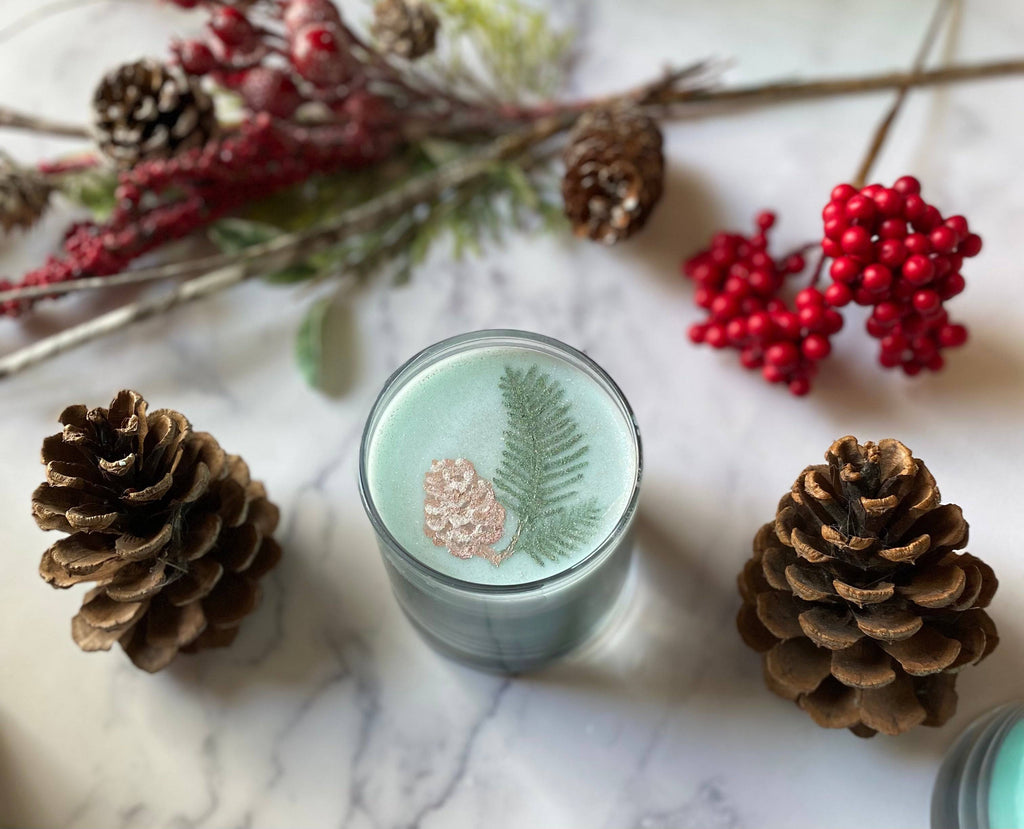
- Paint any design you wish on the surface. We painted a simple pine branch with a pine cone on our candles.
Using Your Wickless Candles
Wickless candles are incredibly easy to burn! All you need is a candle warmer. Unlike a wax melt, you burn these wickless candles right in their jar rather than removing the wax.
We recommend using a heat lamp-style warmer, which heats the wax from above. You can also use a hot plate/warming plate-style warmer, which heats the wax from the bottom up. Either way, you will begin seeing beautiful, sparkling swirls in your wax as it melts and gets the mica powder moving.
As a final note, please be cautious when burning wickless candles. Even though there is no open flame, the melted wax can still get very hot and cause skin burns. Always burn wickless candles in a secure location where the cord for your warmer is out of the way. Candle warmers themselves can become very warm and create a fire hazard if not used properly. Do not burn wickless candles where children or pets can reach them.
Wickless candles are great because they can hold their scent for a very long time. However, when the wax does lose its scent, you can remove it from the container and reuse the jar. It is not recommended to remove the wax by melting it and pouring it out. Instead, let the wax cool completely. Once cool, you can place the jar in the freezer to help the wax shrink. The cold wax should be easier to remove from the glass. Do not put a hot jar of wax in the freezer.
Did you make this recipe? We'd love to see your projects! Share a photo to our Facebook page or use #MadeWithNorthWood so we can see your creations!
