

There are endless colors of nail polish to choose from at the store, but sometimes you have a specific color in mind that you can’t find. On top of that, glittery and colorful nail polish can be surprisingly expensive. With just a little glitter and some clear nail polish, it’s easy to create beautiful custom nail polish in any color you can imagine.
Today we’re going to show you how to make glitter nail polish at home. DIY glitter nail polish takes less than 5 minutes to make, and the creative possibilities are endless!
Love working with glitter? Check out all these other fun things you can do with glitter!
Supplies & Ingredients
- 1 bottle of clear nail polish
- 1 micro scoop
- Glitter and/or mica in any color you want
- Small piece of paper for making a funnel
Note: You may find it easier to work with a partially-used bottle of nail polish. This ensures there’s enough room for you to add glitter. The glitter doesn’t take up much space, but it is easier to shake up if there’s a little room in the bottle.
Our glitters are made of high-quality PET plastic, which is resistant to solvents (like the ingredients in nail polish). That means the glitter particles will not clump up or break down in nail polish. With their particle size of 1/128”, they also create a beautiful, eye-popping shimmer.

Steps for Making Glitter Nail Polish
- Gather your supplies and cover your workspace with paper to protect it from spills.
- Make a funnel out of a small piece of paper by rolling it into a cone with a small opening on one end. You can use tape to hold the funnel together.
- Open the nail polish bottle and set the cap aside. Put the funnel in the nail polish bottle.
- Start by adding 4-8 micro scoops of glitter or mica.
- Replace the lid and shake the bottle vigorously. Check that you like the density of the glitter. You can add more glitter and/or mica if you like.
- Your nail polish is now ready to use! For best results, shake the nail polish bottle before using it each time.
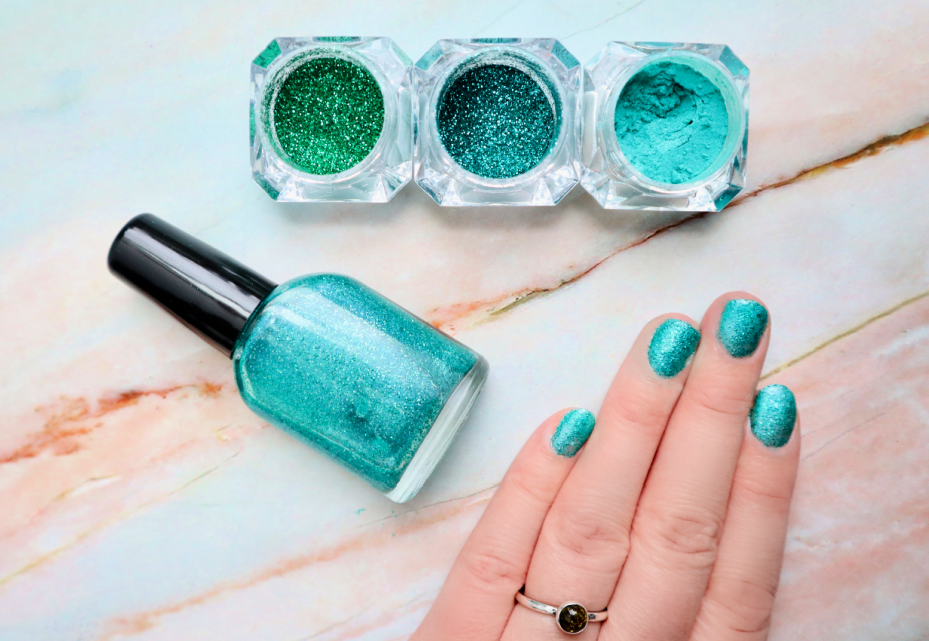
If you like the look of the nail polish in our tutorial, feel free to copy exactly what we did! We added these colors to a partially-used .45 fl oz bottle of clear nail polish:
- 6 micro scoops of Teal Glitter
- 4 micro scoops of Emerald Glitter
- 4 micro scoops of Spring Green Mica
Fun Variations for DIY Nail Polish
NorthWood carries more than 130 colors of glitter and more than 80 colors of mica powder. That includes standard sparky glitter, iridescent glitter, fluorescent glitter and even matte glitter! There are countless ways to get creative with different color combinations and effects.
If you love making your own nail polish, let your imagination run wild with these fun ideas!
- Add glitter to a bottle of colored nail polish rather than clear nail polish.
- Use both glitter and mica powder to make colorful, glittery nail polish.
- Add iridescent glitter or mica for a fun holographic effect.
- Mix multiple colors of glitter for a stunning multi-faceted color.
- Enhance a bottle of store-bought glitter nail polish by adding your own colors of glitter or mica to it!
How to Apply DIY Glitter Nail Polish
Have you ever wondered how people achieve that cool solid-glitter look with their nail polish? You can always paint glitter nail polish on like you would any other type of nail polish. However, the glitter will be thin and it will take numerous coats to get a solid layer of glitter. A much easier way to get that solid glitter look is to use a sponge.
To apply glitter nail polish the easy way, paint some of the polish onto a foam sponge, then dab the sponge onto your nail. The sponge will absorb the lacquer, while depositing only the glitter onto your nail. There are sponges made just for doing nail art, but makeup sponges work too. For a smooth finish, apply a clear top coat after the glitter layer dries.
Note: With this method, it’s very helpful to use some form of manicure latex or tape to prevent the glitter from getting onto your skin. It won’t hurt you, but it’s somewhat difficult to clean off neatly.
How to Dip Your Nails in Glitter
Rather than mixing glitter into nail polish, you can also use our glitter as a nail dip. Apply regular nail polish, then (while still wet) dip your nails into a jar of glitter and tap off the excess. If needed, repeat with more layers of nail polish until you get the desired effect. Finish with a layer of clear top coat once the glitter layer dries.
This method generally uses more glitter than you would use when mixing glitter into nail polish. However, there are lots of fun nail art techniques you can do with this method. Our 30 g jars of glitter are ideal for nail dipping because they give you more room. You can dip your nails in our 2 g jars of glitter too, but it is more difficult to avoid messes.
How to Make Professional-Quality Nail Polish at Home
This tutorial is aimed at those who want to experiment with DIY glitter nail polish. If you’re just making nail polish for fun, using a bottle of standard clear nail polish is the easiest method. The nail polish you make will simply need to be shaken each time you use it, as the glitter and mica will naturally sink to the bottom.
You’ve probably noticed that store-bought glitter nail polish doesn’t need to be shaken before using it. That’s because it’s made with a thicker base that holds the glitter in place.
If you’re really into nail art and love the idea of making your own professional nail polish at home, it’s worth picking up a pre-made nail polish base designed just for suspending glitter. If you plan on making lots of nail polish or even selling your own nail polish, these bases are the way to go.
Small stainless steel mixing balls can also be purchased. Adding one of these balls to the bottle will make it easier to shake if needed.
Did you try this project? We’d love to hear about what you did! Tell us how it went in the comments below or share photos on social media with #MadeWithNorthWood
NorthWood is not responsible for any products you make with our supplies or recipes.