

Lotion bars are made with soothing oils and butters that soak into your skin and leave it feeling hydrated. Unlike liquid lotion, these lotion bars do not contain water. That means lotion bars are much more compact and transportable, which makes them great for traveling. Because they don’t contain water, you also don’t need any preservatives. Follow along as we make this super easy, non-greasy lotion bar recipe!
Difficulty Level: Easy
Hands-On Time: 25 minutes
Cooling Time: 30 minutes
Yield: 5 lotion bars
Project Overview
We’ll start by weighing all of our butters and oils to get accurate measurements. The lotion ingredients are added to a glass dish, then warmed on the stovetop with the double-boiler method. Once melted, essential oils or fragrance oils can be added to scent the lotion bars. The liquid solution is poured into a mold and left to set up.
Natural butters and oils have different melting points, which can lead to an unpleasant gritty texture if you don’t cool them correctly. This is because the various fatty acids cool at different rates. Luckily, it’s easy to prevent grainy shea butter and coconut oil in this recipe! All you need to do is put the lotion bars in the freezer immediately after pouring them. This will force them to cool more quickly and evenly, which prevents issues with the fatty acids becoming gritty.
Supplies & Ingredients
- 50 grams White Beeswax Pastilles
- 30 grams Mango Butter
- 25 grams Shea Butter
- 25 grams Cocoa Butter
- 20 grams Coconut Oil
- 2-4 ml Butterfly Orchid fragrance oil (optional)
- Digital Scale
- Plastic Pipette
- Mini Whisk
- Butterfly Soap Mold
- Glass measuring cup (such as a Pyrex cup)
- Small sauce pan for creating a double boiler
Optional:
- Satin White Mica Powder (for making bars less yellow in color)
- Micro Scoop (for measuring mica, if using)
- Nitrile gloves
- 9x13 baking sheet
- Fridge or freezer for chilling lotion bars
- 2” diameter tins for packaging your lotion bars
Note: We like this recipe because it gives you a non-greasy lotion bar. However, you can swap out the butters and oils in this recipe if you like. If switching oils, we recommend keeping the ratio of beeswax the same. In this recipe, beeswax accounts for about one-third of the mixture. This ratio keeps the lotion bars hard enough to retain their shape, while still being soft enough to glide on easily. Feel free to experiment with different butters and oils to customize this recipe to your liking!
How to Make Lotion Bars
If you are able to do so, start by making some room in your fridge or freezer to chill your lotion bars. Chilling the lotion bars will reduce the chance of having a gritty/grainy texture. Alternatively, if it’s cold outside (under 40 degrees F), you can simply place your lotion bars outside to cool! That’s just another reason we love this project for winter.
If you plan on cooling your lotion bars with one of these methods, we recommend placing your mold on a baking sheet before pouring the mixture in. This will make it easier to move the mold to the fridge/freezer without spilling the lotion mixture.
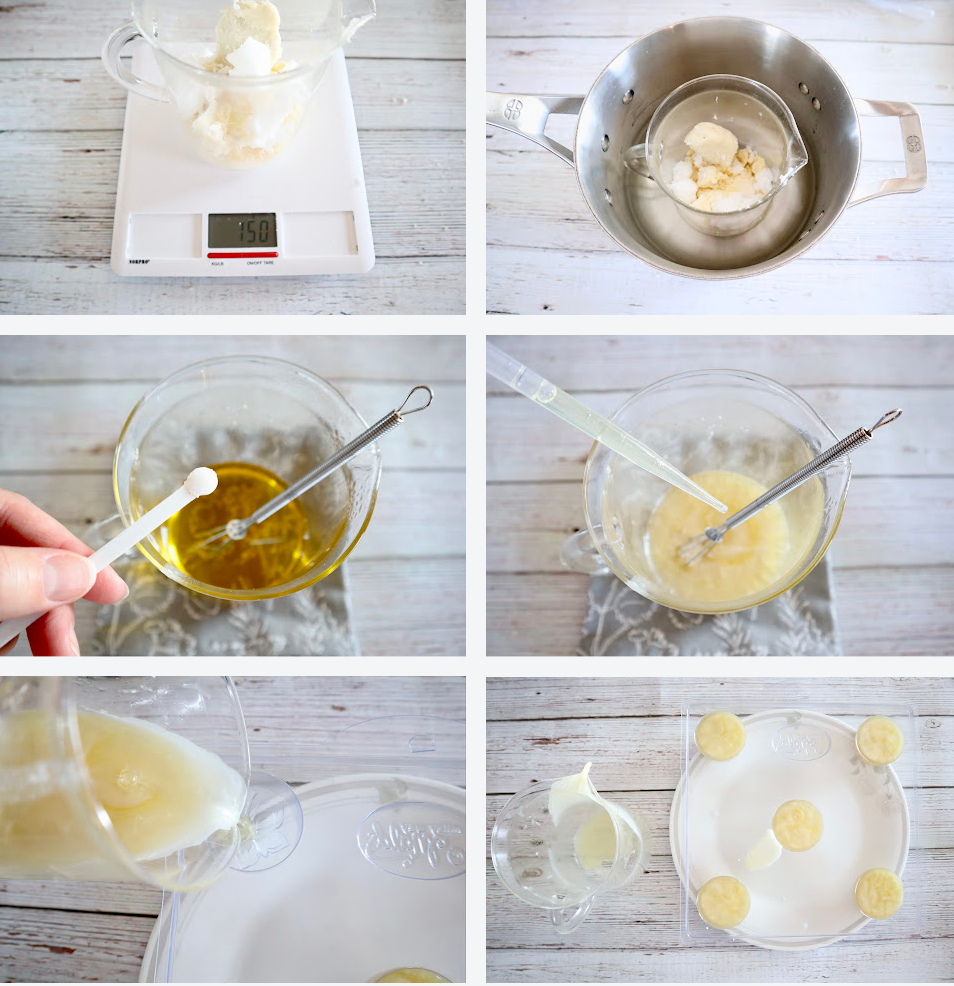
- Place your glass measuring cup on the scale and tare it to zero.
- Set the measurement unit to “grams,” then weigh out the following ingredients into the glass cup:
- 50 grams white beeswax pastilles
- 30 grams mango butter
- 25 grams cocoa butter
- 25 grams shea butter
- 20 grams coconut oil
- Fill a small sauce pan about ¼ of the way full with water. Then place the measuring cup into the pan. The water should come up the sides of the measuring cup about half-way. The amount of water does not need to be exact. You now have a double boiler.
- Heat the sauce pan on the stovetop over medium heat. Stir the butters and oils with a mini whisk to help them melt.
- Once melted, turn off the heat and carefully remove the measuring cup from the water. The glass may be hot, so please use extra caution when handling it. Avoid touching the part of the measuring cup that was submerged in the hot water.
- Optional: Wearing a mask, add 2-4 micro scoops of white mica powder to the melted oils. Stir with a whisk until dissolved.
- Use a pipette to transfer 2-4 ml of fragrance to the melted oils. Stir with the whisk until completely combined.
- Pour the mixture into each cavity of the mold. Be careful not to overfill the cavities, as this will make it more difficult to move the mold without spilling.
- Move the mold to the fridge or freezer to cool. Let it sit for about 30 minutes or until the bars appear hard.
- Wearing gloves, remove the bars from the mold. Let them reach room temperature, then package as desired. If using the Butterfly Soap Mold, the bars will fit perfectly into most 2” diameter tins.

How to Use Solid Lotion Bars
To use a lotion bar, hold it between your hands for a few seconds to help the oils warm up. Then rub the lotion bar over your hands. Let the lotion absorb for a few minutes before handling anything, as your hands may be oily.
This recipe results in slightly softer lotion bars compared to other recipes. This means the lotion bars will glide on more easily. Our favorite part of this recipe is that these lotion bars are not greasy. Once you apply the lotion, it should soak in within a few minutes, leaving your hands feeling hydrated without an oily residue.
Be sure to store your lotion bar on a non-porous surface. Placing the bar onto wood, fabric or other similar surfaces may result in staining. A good way to store your lotion bars is in a small tin or on a small ceramic tray.
NorthWood is not responsible for any products that you make with our supplies or recipes.